Thursday 22 May 2014

Lamb Kofta, Pitta Bread, Tabbouleh and Raita.


So a while ago I said I would post savoury stuff soon, but I haven't really managed. I have been cooking plenty, and usually trying something different once a week or so, but I just haven't managed to do step by step photos. Especially since by the time I make a meal like the one I had on Tuesday night, I'm not really up for writing up full descriptors afterwards. As you can see, there were lots of different elements to the meal:

From upper left going clockwise: pitta bread, lamb kofta, tabbouleh, hoummus, raita, butter, and gem lettuce.
And I just couldn't manage to take photos along the way, look after children, and create this meal.

But I snapped a photo at the end, as it did all look so pretty together. I had leftovers for my lunch at work today and felt quite proud bringing it in. Then my colleague said her boyfriend had made paella the night before and I felt somewhat less smug about my cooking.

The only thing I didn't even attempt myself was the hoummus/hummus. Every time I make it myself it just ends up too pasty, too lemony, too oily...too pointless to make myself since supermarkets do such a great job of making tubs of it available everywhere. If you think you could convert me with your own recipe for it, please offer it here.

But if you want any of the other recipes, just click below on the links or read below for Joy of Cooking's Tabbouleh.

Lamb Koftas - I omitted mint (I already had it in the raita and the tabbouleh) and added paprika
Pitta bread - the recipe buried at the bottom of my falafel post
Raita

Tabbouleh

Combine in a large bowl:
160g bulgar wheat
500ml boiling water

Cover and let stand for 30 minutes, then drain any excess water using a sieve, pressing down with a wooden spoon if necessary. Return to the bowl.

In a small food processor pulse until a rough puree is formed:
1 medium onion
1 packet parsley
1 packet mint

Stir this into the bulgar wheat. Add

1 small pack cherry tomatoes, halved
1/2 a cucumber, chopped
1/2 tsp salt
a good grinding of black pepper

Whisk together
juice of 2 lemons
80ml olive oil

Add to the bulgar and toss to coat. Serve alongside leaves of gem lettuce.


Wednesday 21 May 2014

Brownies

One of the first things I ever learned to bake was a batch of brownies. Not from scratch, of course, but a box of Duncan Hines best - a fudge brownie with milk chocolate chunks. With just a couple of eggs and a good dose of vegetable oil, magic came to visit our humble kitchen and we were gifted heavenly brownies and even better- brownie batter, the king of all baking batters.

They don't make that particular mix anymore, sadly. Ghiradelli does an amazing mix, but it is not enough for a full 9 X 13 pan, so I'm always slightly disappointed by its yield compared to its deceased cousin Duncan. So naturally, I went on a search for my own recipe to make them from scratch...and in bulk.

I asked around, as I had never had much luck making them before. A bad brownie is such a dark disappointment. So often they end up too dry, too bland, crumbling about - just a big waste of calories without any pleasure. Most people pointed me towards a trusty box mix, but one gave me a link to the King Arthur Flour recipe, and I was sold. I first found them a wee bit rich, as I used 70% chocolate chunks rather than chocolate chips, but once I used just regular chips they came out perfectly. It is this recipe that made me decide to order the 9 X 13 pan online, as they are not readily available here in the UK. Every time I decide to make these, I am glad I did.

Assuming you have the big quantities of what's needed to make these, they are pretty straightforward.

Into one bowl goes your beaten eggs, loads of cocoa, some vanilla, salt, and raising agents. Oh, and some espresso powder. Did you know espresso gets its name from the "press" due to the way it's made, rather than "express" for fast. That's why people get annoyed when you say expresso.

But I won't judge you if you say expresso.


That all gets beaten into a smooth, thick paste.


Then you take a whole lot of butter and loads of sugar. The sugar is tinged with brown since I didn't rinse out the measuring cup. Would you?


That gets heated and melted together so that the sugar starts to dissolve. That helps make the brownies fudgey I guess.


Then it gets stirred into the cocoa mix. Try not to tell your kids you are making these, by the way, or they will not leave you alone until they get a spoon.


Our next photo is sponsored by the lovely people over at Costco. Now, usually here in the UK if you want to bake with chocolate chips you have to buy them in measly little 100g bags, meaning you need half a dozen of the things to whip up a decent batch of cookies. It's fiddly, and it makes you feel like a hoarder when you strip a store's supply of them just for a school bake sale. An American friend, who has a Costco membership, told me how she freed herself of these shackles by buying huge bags at Costco. She let us come along on a recent jaunt there, and I made sure to put these on my list.


We came home with two of these babies. Oh the joy of just scooping out what I need and STILL HAVING SOME LEFT! I was oh so happy. So before they got added, the batter looked like this.


So pretty...so tasty...

But we did need a bit of flour along with the semi sweet morsels to make it into brownie batter.


Oh man, this stuff is amazing. Cookie dough has nothing on this.


Somehow I managed to smooth most of it into a pan. But some flew out of the bowl and into my belly first.


After a little while in the oven, I took them out looking like this. Resisting every temptation, I let them cool completely. Hot brownies are good, but I love them cooled and sliced into fudgy perfection.

And please, please people. Do not overbake your brownies. Moist crumbs should be sticking to that knife when you poke in the middle, and melted chocolate will get on it too. That's a good thing. Dry, solid bricks are not.


The greaseproof paper lining underneath them with a long edge means it's easy to grab and lift them out for slicing. I'm switching tenses now. I think I'm tired. Or maybe I just need a brownie.


Too bad they're all gone now cause I made these last week.


Time to get that bag of chips out again, I think...

And if you want the recipe, just go To King Arthur Flour's site here.

Tuesday 6 May 2014

Fraisier Birthday Cake

At my office, whenever it is someone's birthday, the office organiser purchases a card and secretly passes it around desks for signatures before its presentation on the day, and the gift of the card is usually accompanied by some sweet treat. So when I was in on Friday, and the lights were dimmed, I got excited. I knew what was coming.

"Cake!" I whispered to myself.

I watched my colleague come towards me, but there were no candles, just a card. A lovely card, with funny little notes from all the people with which I work. My eyes drifted around around for a moment, but saw nothing else.

"Sorry the others couldn't be here today, here's your card," my colleague smiled. "But no cake, because, well, you make the cake around here!" The lights came back on.

Damn. I knew it was my own fault. I mean, in previous years I have brought in my own cake on my birthday. This year, I just didn't plan ahead and just kind of forgot. I was ready for Sainsbury's finest.

And she was right. I do make the cake. So when my husband asked me what kind of cake I'd like for my actual birthday, I told him not to worry, I was going to make it.

And blog it.

Sad, I know.

I don't have steps the whole way along, because my youngest is in his exploring mode. He likes sharp knives, wires that go around his neck, and easily breakable glassware, not to mention regularly emptying cupboards onto the floor. So here you will see tightly cropped shots on the whole, and where they are not you get glimpses into the chaos that is my household right now.

"Oh, treasure these moments, they pass so quickly" I hear the older readers say...as they quietly read without interruptions in their regularly hoovered homes.

The recipe is one I tried once before and loved. Afraisier is apparently the traditional birthday cake in France, and is a bit of an effort. You can think of it as a posh trifle - layers of syrup soaked sponge cake with custard and fruit topped with marzipan and chocolate decorations.

"But there's no jelly!" my son wishes to add.

True, no jelly...though you might get some places adding a posh French strawberry gelee I think. Just not me.

If you watched the Great British Bake Off the season before last, you may recognise this cake as one of the technical challenges.

So first I beat whole eggs, sugar, lemon zest in a bowl over some simmering water.

They got lighter and bigger.


And bigger and lighter.


And so on.


Until they looked like so. I think I had the water on a bit too high a temp, but oh well.


In went some self raising flour. In the USA salt is included in a bag of self raising flour but that is not the case here in the UK. Just plain flour and raising agents.


I folded it in like so.


Then in went some melted butter. The smell of melted butter always makes me think of popcorn. This cake does not taste like popcorn.


Once that was folded in I put it into my new springform tin, purchased at our local Bethany charity shop. It is slightly narrower than the one I used last time I tried this recipe. There were a few specks of flour not totally folded in, but there was also a toddler screaming and banging his head against a cabinet door handle, so I decided he was my priority at that moment.


When the cake came out of the oven, it looked like this.


After it had cooled, I took a bread knife and slowly cut around the sides until I had two halves, then used a big spatula to separate the halves.


Here is the hacked middle.


Then I took my trusty new springform and lined the sides with clingfilm. If I were a French pattiserie worker, I would have used acetate, but I am not, so clingfilm it was.


In went the first half of the sponge, with some lemon syrup on top. Just sugar and lemon juice boiled up together, nothing too complicated.


Then strawberry halves around the sides. I got these at the farmers market over the weekend in anticipation of this cake. Scottish berries are amazing - soft and sweet. No need for sugar really, I happily eat these on their own, but they look so pretty in this cake.


Then, rather than dealing with a piping bag, I filled a freezer bag with the creme patissiere I had made the day before. There was lots of swearing going on, and lots of shouting at my kids to keep their younger brother happy. "JUST PLAY WITH HIM!" I said. So they clapped their hands and shouted his name. "USE TOYS!" I suggested. They showed him their Lego. "TOYS HE ACTUALLY PLAYS WITH! LIKE HIS BALL, OR THE XYLOPHONE!"

They got there in the end.


So yeah, I kind of wish I had just got out my piping bag from on top of the shelves. It would have been prettier than this. Thankfully, it would all get hidden later. Until then, here we have an image of a pig's intestines.


Whenever something is ugly, just throw fruit on top. I think strawberries look prettiest on the sides, but I prefer raspberries inside.


Then more creme patissiere (or stiff custard if you will) on top, smoothed with a palette knife. At this point I kind of wished I had used the larger tin.


On top went another layer of the sponge, pressed down firmly, and the last of the syrup. The syrup's lemon juice helped me to get my five a day.


The instructions then told me to roll out 200g of marzipan and cut it to shape. I found an old bag of that confection in the cupboard, cut off the crusty end, and rolled it out very quickly. I then grabbed the parchment circle from the cake tin and used that to roughly cut out the shape. Perhaps I should have taken more care, as this is the final layer and what is visible on top. Or perhaps it doesn't matter, because it's still marzipan and it was my birthday.


See, not so perfect. Meh.


So I got out my piping set and melted dark chocolate. I swirled it around on some clean parchment paper, let it set (it only took a couple minutes) then stuck the pieces on top of the cake with a couple of sliced strawberries. See, just like a posh bakery.


I tried and failed to make a butterfly on the bottom right.


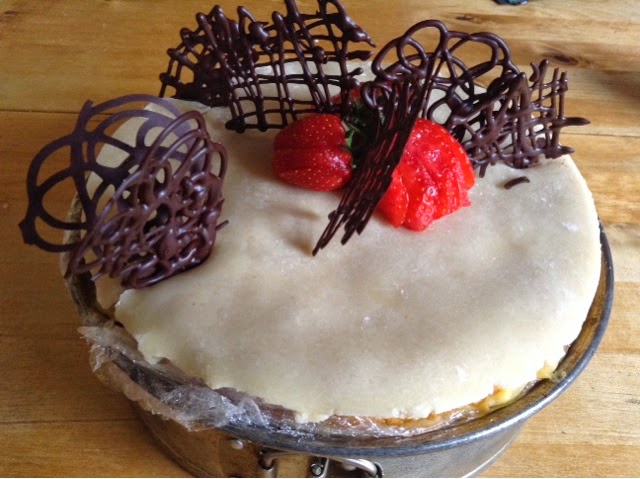
I then let it set in the fridge until just before cake time. Nervously I took it out, released the spring, lifted off the sides, and peeled away the clingfilm...


Voila! Just like grandma used to make.


It tasted good too, even with melted wax on it.

If you want to make a prettier one yourself, just do what Mary Berry says and go to this recipe here.

In the meantime, I'm gonna party like it's my birthday.