Wednesday, 6 November 2013

Falafel

Well, after a couple of mutton and haggis evenings, we have gone back to vegetarian fare.  And what vegetarian doesn't like a good serving of falafel?

I've made this Joy of Cooking recipe for years using a tiny food processor but it only began to look like real falafel once I got a full size Magimix.  I don't know of anyone who has ever crushed the chickpeas by hand, but seeing as falafel has been around longer than food processors, people obviously have.  It does make it a lot easier if the machine does the work for you.

I feel like I'm back in college mingling with eco vegetarians whenever I make this.  But I'm not.  I'm in a Victorian tenement listening to uni students walk past talking about how drunk they were last night. Ho hum.  Apparently Emma was absolutely hammered.

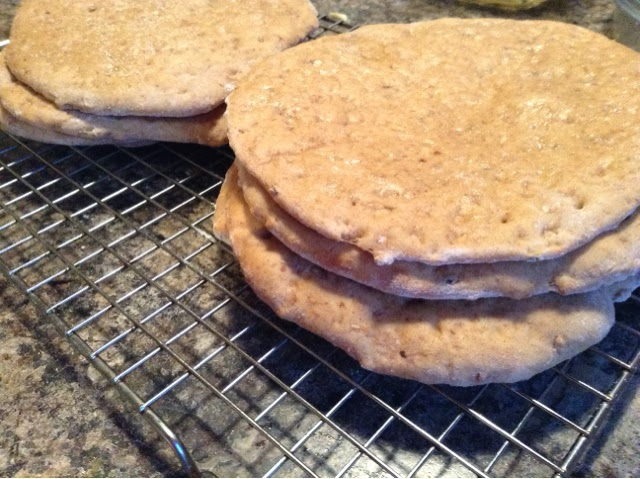
And while my bread recipe is officially given the name "pita bread", it is really just flatbread, as I have not mastered the pocket inside.  Most times I get it to work, but not this time.  Still tastes good.

So here's most of what I had.  The kale is hiding in the fridge as the others didn't want to play with her, but I still think she goes nicely with it all.

I poured some boiling water on some chickpeas in the morning while 2 kids were away.  It only takes an hour to soak them this way, but I figure a bit longer of a soaking won't hurt them.

I also set aside the other ingredients for the falafel mix: onion, garlic, parsley, coriander seed, cumin seed, paprika, salt, and baking soda.  By this time I was due out to get a child, so out the door I went.


After lunch I did the dough for the pita bread.  Just yeast, water, wholegrain flour, and salt kneaded together for a few minutes then left out for a few hours during the school run.
Before kneading
After kneading


When I came back, the dough had risen (though not too dramatically, as I had used cold water and left it in a cold room) and the chickpeas were looking nicely swollen.

Soaked and ready


I then heated up my oven and baking stone to bake the breads in a super hot oven.  


You're supposed to know they're nearly done when they puff up in the middle with a big air pocket.  Mine didn't (I suspect the flour may have something to do with it).  


Meh, that just made them flatbreads.  I just smeared a tiny bit of butter on them and kept making more.


Until I had a nice stack of them.

Then into the food processor went all the falafel ingredients until it became a paste.  I added a bit of flour - I think this helps keep it all together and cook well.


Oh, and I sliced up a few other veggies to put on top.  The kale was steamed, but still hid.


I rolled up the falafel mix into pieces and set them aside while I heated some oil

mmmm....oil...
It only took a few minutes on each side to brown them.
Then onto paper towels to drain them.


Then I opened a jar of Tahini, stuck everything on the table with some lemon wedges, and we were ready to eat.  Some assembly was required.


Recipes below.  Or just look in the Joy of Cooking if you have it, as that's where I got both recipes.

Pitta Bread

450g wholegrain flour
1 tsp salt
4 tsp instant yeast
310 ml water

Dissolve yeast in water then add flour and salt.  Knead until you are bored.  Add flour as needed - the dough should be slightly tacky but not sticky.  transfer the dough to an oiled bowl and turn it over once to coat.  Cover with clingfilm and allow to rise at room temperature until doubled in size.

Punch the dough down, divide equally into 8 pieces and preheat your oven to 230C with baking stone or tray inside.  Roll out each dough piece to a thin round and place as many as you can fit onto the baking stone.  Bake for about 3 minutes each - they should puff up and brown at edges, and you want to remove them about 30 seconds after they puff up.  Remove them to cooling rack and brush lightly with butter.  

Falafel

210g dried chickpeas
1 small onion
12g (half a bag) of parsley leaves
2 cloves garlic
2 tsp cumin seeds
1 1/2 tsp salt
1 tsp coriander seeds
1/2 tsp baking soda
1 tsp paprika
2 Tbsp

Vegetable oil for cooking

Toppings
a few tomatoes, sliced
half a cucumber, sliced
bunch of kale, trimmed and steamed
tahini

Place chickpeas in bowl and pour over boiling water to cover by at least one cm.  Soak for an hour or more.

Place soaked chickpeas and other ingredients except flour in food processor and pulse until pureed. Remove to a bowl and stir in flour.  With wet hands, shape the mixture into walnut sized balls (or larger if you prefer) and set on plate.  

Heat a deep frying pan with 1cm oil.  Fry the chick pea cakes until golden on  both sides, about 4 minutes each side.  Drain on paper towels.  

Serve with pita breads, sliced tomato, cucumber, steamed kale, and tahini.


Tuesday, 5 November 2013

Caramel Corn

So it's not just Pinterest that is to blame for new recipes...

Recently a friend posted this link:http://food52.com/blog/7767-how-to-make-any-caramel-corn-in-5-steps

and even tagged me when asking advice about caramel.  I am certainly no expert with the stuff, as you can see from my Samoas post, but I couldn't resist giving it a go.  I was particularly excited when this recipe said to stir, as I'd always read that stirring would make my caramel go grainy.

It was Bonfire Night a.k.a. Guy Fawkes, so in lieu of going out and watching fireworks, we decided to have exploding popcorn on our stove.  I gave the kids strict instructions to stay at the far, far end of the room while I tried the caramel.

I don't really have any photos because all three kids were there and there was HOT BURNING SUGAR too.

Bad news: my caramel turned out grainy.  Oops.  I think I stirred too early - I think I should have let the sugar dissolve fully into the butter first

Good news: it still tasted fantastic.  I'll definitely try, try again.  Maybe for the nursery ceilidh coming up...


Monday, 4 November 2013

Pumpkin Whoopie Pies


Pumpkins are a relatively recent addition to the Hallowe'en scene here in Scotland.  I used to have to hunt around a fair amount to find them, but now they are at every supermarket and veg stall in town. Mostly they are the small, "pie" pumpkins rather than the large ones fit only for carving, which means I feel guilty if I don't at least attempt to cook them afterwards.  I bought and carved three pumpkins this year, then chopped them, steamed them, peeled them, pureed them, and drained them, so I had a fair amount of pumpkin and a good understanding of why most people just use a can.  Of course, I also have a bag of pumpkin in my freezer from two years ago, but we're just going to ignore that for now.

This recipe uses 3 whole cups of pumpkin, so it seemed a good way to make a dent in my jack-o-lantern supply.  Until I'd made these, I'd never made whoopie pies before, but I think I'm pretty sold on them now.  I just don't know how to store or transport them well, as they seem to be kinda sticky.  But first, you have to get together a few things:


Oil and sugar first.  The oil keeps them from drying out, but doesn't add flavour, so there has to be a lot of other good stuff going on to compensate for that.  Brown sugar is one.


Pumpkin is another.  Not so bright as the stuff in the can, but allegedly they don't actually use pumpkins to make the canned stuff.  It's some weird squash hybrid.

I mixed all that together: 

And then added a couple eggs.


Meanwhile, in another bowl, I put flour, baking powder, baking soda, salt, cinnamon, ginger, and ground nutmeg together to add flavour:


Then dumped it into the liquid mix and stirred it all together.  It's a pretty forgiving mixture; I had some small lumps like muffin batter due to the fact I didn't have as smooth a puree as the canned kind, but it all worked out well in the end.


You can just put spoonfuls on a tray but I thought I'd try piping it.  Here's an easy way to fill your piping bag in case you haven't done it before - use a tall glass to hold it in place.  Works a treat.


I piped rounds onto the lined tray then stuck them in the oven for about 9 minutes.


They came out looking good...


But with the odd brown sugar lump.  I can live with that.


Then I whipped up some filling.  I didn't have as much icing sugar as the recipe demanded, but anyway it seemed too sweet before when I made it.  I also increased the proportion of butter to cream cheese, as I found last time it was a bit runny.  I cut down the vanilla and maple syrup too.  It definitely held together better this time.


Then I tried to match them by size as best I could and voila!


Pumpkin Whoopie Pies adapted from Annie's Eats
Yield: about 32 sandwich cookies

INGREDIENTS

For the pumpkin cookies:
3 cups all-purpose flour
1 tsp. salt
1 tsp. baking soda
1 tsp. baking powder
2 tbsp. cinnamon
1 tsp. ground ginger
½ tsp. ground nutmeg
1 cup caster sugar
1 cup dark brown sugar, firmly packed
1 cup vegetable oil
3 cups pumpkin puree
2 large eggs
1 tsp. vanilla extract
For the maple cream cheese filling:
2 cups powdered sugar, sifted
125g unsalted butter, at room temperature
8 oz. cream cheese
1 tbsp. maple syrup
1/2 tsp. vanilla extract
Cooking View

DIRECTIONS

  • To make the pumpkin cookies, preheat the oven to 350° F.  Line two baking sheets with parchment paper or silicone baking mats.  In a large bowl, whisk together the flour, salt, baking soda, baking powder and spices.  Set aside.  In a separate bowl, whisk sugars and oil together.  Add the pumpkin puree and whisk to combine thoroughly.  Add the eggs and vanilla and whisk until combined.  Sprinkle the flour mixture over the pumpkin mixture and whisk until completely combined.
  • Transfer the cookie batter to a pastry bag fitted with a large plain round tip .  Pipe small rounds of the batter onto the prepared baking sheets, about 1½-2 inches in diameter.  (If your dough seems to thick to pipe, you can drop scoops of it onto the baking sheet.  Or just add a bit more liquid.  This recipe is pretty forgiving.)
  • Bake for 10-12 minutes, until the cookies are just starting to crack on top and a toothpick inserted into the center of a cookie comes out clean.  Remove from the oven and let the cookies cool on the pan for about 10 minutes.  Transfer to a wire rack to cool completely.  Repeat with remaining batter.
    To make the filling, combine the butter and cream cheese in the bowl of an electric mixer.  Beat on medium-heat speed until smooth, about 1-2 minutes.  Add the powdered sugar, maple syrup and vanilla and beat until smooth.  Be careful not to overbeat the filling or it will lose structure.  
  • To assemble, pair the cookies up by size.  Spoon filling onto the flat side of one cookie of each pair, and sandwich together with the remaining cookie.  Refrigerate for at least 30 minutes to firm before serving.

Sunday, 3 November 2013

Haggis, Neeps, and Tatties...and Kale

It seems a bit ridiculous to post anything about cooking haggis, neeps, and tatties as the directions are basically "boil and serve."  But tourists are always asking about haggis, so I figured North Americans might appreciate the novelty of the menu.

The meal began with a morning's trip to the Farmers' Market.  On my way out, I asked my husband if there was anything he wanted me to get, and he replied "game, maybe?  Perhaps a hare?"

Well, the main game stall that I go to was absent - I think the hunting season is over - and while I was unenthusiastically eyeing the venison I spotted something we hadn't had in ages.  Haggis!  So easy to cook, and the vegetables to accompany it are nearly always neeps (swede/rutabaga) and tatties (potatoes).  Just mashed, nothing special, but together they are wonderful.  So I got some haggis and then picked up the mash veg along with a bag of kale because, well, we all need our leafy greens.  Or purples.

I also remembered that I still owe my friend Maggie a package of veggie haggis in the post, so if you are reading this, Maggie, I will send it one day.  Just not today.

So what is haggis anyway?  Like sausage, it was invented to use up all the innards of the animal, in this case a sheep.  It's a mix of oats, spices, onion, and lamb offal, cooked up in a sheep's stomach.  Getting hungry yet?  Being Scotland, you can of course buy it battered and deep fried at the chippy, but that is not the traditional way to cook it.


First I tackled the Neeps.  Oh, swede, how I hate prepping you, especially when you are covered in soil and roots from East Lothian.


Then the potatoes.


I wrap the haggis in foil to steam them.  This way, if the skin bursts and it all comes spewing out, it doesn't disappear down into the boiling water.


I carefully trimmed and chopped the kale lovingly by hand.

Just kidding, into the food processor it went.


The potatoes went into the steamer too.


Then it all got mashed up with butter, hot milk, and seasoning.  When this was set before me (yes, my husband served up) I was excited.


I immediately went for the haggis, and my disappointment was extreme.  In 13 years of eating haggis I had never before had a "bad" haggis, but I suppose there is a first time for everything.  This was everything haggis should not be: gluey, flavourless, and bland.  I couldn't even taste any pepper.  It was truly awful offal.  

It was a bit like this, only with me, not this lovely model:


So I won't be posting any recipes below, I shall simply say stick with MacSween's haggis...or go to Saundersons at Tollcross, as they do a mean haggis too.  Just do not ever buy one from Peelham Farms.

Saturday, 2 November 2013

Pumpkin Scones


Yes, we Americans do love our pumpkin.

And no, these are not savoury scones, they are the American type of scone - sweet, cut into triangles rather than rounds, and in this case drizzled with a sweet, spicy glaze.  And while I am not ready to use the American pronunciation that rhymes them with stone, I do like how they are designed to last slightly longer at room temperature than their British cousins.  They are wonderful with coffee or tea, and the pumpkin ensures that they are virtually impossible to dry out in your oven.

I made them once before with some pumpkin I had lingering in my fridge after making pumpkin whoopie pies.  On that occasion, I was less than precise with my measurements and ended up with a very wet dough that couldn't be cut into triangles and was just shoved into the oven in a big mound.  When it was nearly done I took it out and cut it up, separating the pieces on the tray, before putting them back in to finish baking.  This time I actually followed the recipe and had a much more workable dough, though I think I might prefer it with too much pumpkin and the improvised cutting process.

These are also the result of not setting the clock back on my Kindle.  You see, the other morning my daughter came through and said "it's getting light out, is it morning time?"

I checked my Kindle, saw it was nearly 7, and said "sure, we can get up."

Of course, once my daughter, baby, and I reached the kitchen, I realised my error, seeing it was, in fact, nearly 6am.  If I am forced to be up this early, there are two ways I cope
1) I consume a large pot of proper leaf tea
2) I bake something

A the kettle boiled, I got out a few things:


Into a bowl went some flour, baking powder, sugar, cinnamon, ginger, cloves, and nutmeg.

  And butter.

  Of course.
And this is what it looked like after I rubbed it in with my left hand and held a baby in my right one.
Then in went some pumpkin, egg, and cream
And I kneaded it a few times with my scary big pink hand.

I then made a rough circle and cut it into 8 wedges which I placed on a tray and put in a hot oven.


They came out looking like this:


Then I drizzled a bit of a glaze made of cream, icing sugar, and cinnamon over the scones.


And I ate them.  And they were good.  Very, very good.  I might even make some more soon, as my jack-o-lanterns are in the process of being slaughtered, steamed, pureed, and drained to make puree. There's a reason I usually buy the pumpkin puree in cans.


Starbucks Copycat Pumpkin Scones

Yield: 8 scones | Prep Time: 15 minutes | Cook Time: 15 minutes | adapted from  Iowa Girl Eats 

INGREDIENTS:

2 cups all purpose flour
7 tbsp. caster sugar
1 tbsp. baking powder
1 tsp cinnamon
1 tsp ginger
1/2 tsp ground nutmeg
1/4 tsp ground cloves
1/2 cup canned pumpkin puree (or more if you want to be daring)
3 tbsp. double cream
1 egg
6 tbsp. unsalted butter, chilled and cut into cubes
For the spiced icing drizzle:
1 cup + 3 tbsp. powdered sugar
3 tbsp. double cream (more if you like your icing runnier)
1/4 tsp cinnamon

INSTRUCTIONS:

  1. Preheat oven to 425 degrees Fahrenheit (220C) and lightly flour a baking tray.  
  2. In a large bowl, combine flour, sugar, baking powder, and spices. Mix until well blended.
  3. Add the cold butter and incorporate with your hands or a pastry blender until mixture resembles breadcrumbs in appearance.
  4. Add pumpkin, egg, and cream and knead briefly until just combined.  If the dough is too sticky, add a bit of flour to make it manageable.
  5. Flatten the dough into a 1″ thick circle, then cut into 8 wedges.
  6. Place the wedges on the prepared baking sheet and bake for 10-15 minutes, or just until they’re starting to turn golden brown.
  7. Remove from oven and place on a wire rack to cool completely.
  8. In the meantime, make the spiced icing drizzle by combining all the ingredients in a bowl and mixing until combined.
  9. Once the scones have cooled as long as you can stand it, drizzle the spiced icing on top.   
  10. Once cooled, store in an airtight container for up to 2 days.  Ha ha ha, just kidding, eat them all now.