"I want the same kind you had!!" he quickly replied.
"A fraisier? Are you sure? You don't want a chocolate cake? Or just a lemon drizzle cake? Or a victoria sponge?"
"No, I want the kind you had!"
He's lucky he's worth it...you'll see why...

First you put some eggs, sugar, and lemon zest in a bowl over a pan of simmering water.

Then you ask your husband to plug in the electric mixer because the outlet still isn't screwed in properly even though the boiler was changed (and the panel behind the outlet dismantled) 6 months ago.

And after a few minutes it is light and fluffy like this, the "ribbon" stage where if you can see a ribbon of batter stay on the top for a bit if you dribble some across.

In went some of the self raising flour to be folded in.

Then in went the rest.

And what makes everything better? BUTTER OF COURSE!!! Melted, so no need to worry about "room temperature" consistency, thank goodness.

Then it went into a lined springform pan. I didn't trim it enough, hence the jagged edge.

While that went in the oven, I started on the creme pastisserie by heating some milk and vanilla paste (I rarely can be bothered with using actual vanilla beans).

In a separate bowl went eggs, egg yolks, corn flour, and sugar.

Once the milk was hot it was poured into the bowl and whisked.

Then returned to the pan.

Once it had thickened, in went butter.

Lots of whisking was necessary here.

Then into a freezer bag it went, to be put in the fridge to be ready for piping later.

Then I moved onto the syrup that keeps the sponge MOIST. Lemon juice and sugar.

It was heated until boiling and until all the sugar was dissolved.


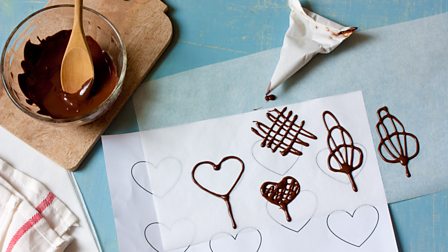
By this time I had to go and get the kids from school, so Michael printed off some stensils and piped melted chocolate onto greaseproof paper for me to transfer later.


Now for assembly. I rolled out some marzipan using icing sugar to prevent it from sticking

And then traced a circle onto paper, then cut out the paper and put it on top like so.

Look, I can make a circle! Sort of.

Not having acetate to hand, some clingfilm went around the side of the now empty springform pan.

The sponge was sliced in half with a big bread knife.

And half the syrup was put on the bottom half after I'd wedged it into the tin. Robert helped.

Sliced strawberries went around the sides.

And the filling was squirted between them.

Then I squirted big creme pat turds all through the middle.

On went quartered strawberries. I sometimes put raspberries in instead, but have strawberries around the sides as it's prettier that way.

More creme pat turds.

Then I squashed on the other syrup soaked layer of sponge.

Then the marzipan...

Then the writing and garnish.

We had wanted to have it on the night of his birthday, but Catherine had fallen asleep by the time Christopher got home from cricket, so we decided to have it for, er, breakfast instead.
I mean, it had fruit and nuts in it, didn't it? And lots of eggs too...10 I think in total.

My son made his birthday wish

And smiled on his parents' great efforts.

He was delighted to get all the candles on the first attempt.


And I was happy not to have to do any more baking for a bit.
The GBBO technical challenge recipe is here, or in copy & paste form below. All 34 friggin steps of it:
Ingredients
- 125g/4½oz caster sugar
- 4 free-range eggs
- 2 lemons, zest only, finely grated
- 125g/4½oz self-raising flour, plus extra for flouring
- 50g/1¾oz unsalted butter, melted and cooled slightly, plus extra for greasing
- For the crème pâtissière
- For the lemon syrup
- 75g/2¾oz caster sugar
- 2 lemons, juice only
- To finish the cake
- 200g/7oz marzipan
- 200g/7oz dark chocolate, for decoration
- 600g/1lb 5oz medium sized strawberries
Preparation method
- Preheat the oven to 180C/350F/Gas 4.
- Grease, flour and line the base of a 23cm/9in spring-form or round loose bottom cake tin.
- Place the sugar, eggs and lemon zest in a large bowl set over a pan of simmering water.
- Using an electric hand whisk, whisk the mixture over a medium heat until doubled in volume and pale in colour. The mixture is at the right stage when it forms a ribbon trail when the whisk is lifted out of the mixture. Remove from the heat.
- Sift in two-thirds of the flour and gently fold into the whisked mixture with a metal spoon or spatula. Add the remaining flour and fold again. Try to keep in as much of the air as possible. Make sure all the flour is incorporated into the mixture.
- Gently fold in the melted butter.
- Pour the mixture into the cake tin and bake for 25-30 minutes or until the sides of the cake begin to come away from the tin and it is pale golden-brown.
- When cooked, allow the sponge to cool a little bit in the tin, then turn out onto a cooling rack. Be careful as this sponge is quite delicate. It should be just under 5cm/2in in height.
- To make the crème pâtissière, pour the milk into a wide based pan, split the vanilla pod along its length using a sharp knife, and add it to the milk along with the vanilla seeds. Bring the milk up to the boil, then take it off the heat.
- Whisk together the eggs, sugar, kirsch and cornflour in a medium sized bowl until blended.
- Remove the vanilla pod from the milk and pour the hot milk through a sieve into the egg mixture. Whisk to combine.
- Pour the custard back into a clean saucepan and set over a medium heat.
- Stir the custard constantly until the mixture thickens. The mixture will take about four minutes to thicken, but when it does it happens very quickly, so you need to really keep stirring to prevent lumps. Whisk until smooth.
- Cook the mixture until the crème is very thick, so that it can be piped and it will hold its shape. Stir in the butter until thoroughly melted and combined.
- Allow to cool slightly, pour into a shallow dish and chill in the fridge for about an hour until really cold and set firm. This chills it faster as it cools over a larger surface area – alternatively you could fill the piping bags with it at this stage and leave overnight to chill.
- Place the ingredients for the lemon syrup in a small saucepan with 70ml/4½ tbsp water. Heat gently until the sugar dissolves, then boil rapidly for two minutes. Remove from the heat and set aside to cool.
- Meanwhile, roll out a thin disc of marzipan to fit a 23cm/9in circumference circle. It is best if you draw around the 23cm/9in base of another loose bottomed tin for the perfect circle. For best results and a perfectly flat surface, chill it in the fridge until it is needed.
- Slice the sponge in half horizontally, creating two slim discs of cake. The cut must be as level as possible as it will be visible in the finished cake.
- Place a strip of acetate plastic around the inside of the springform tin. Or line the base and sides with cling film or parchment lined foil.
- Place one layer of sponge cake in the bottom of the cake tin. Then liberally brush the sponge with half the syrup. With the back of a spoon, gently squash the edges of the cake down so that they are pushed directly against the sides of the tin, creating the defined edges necessary for the Fraisier cake.
- Rinse, hull and halve about 12 strawberries, try and make sure they are all the same height.
- Place the cut sides of the strawberries against the plastic on the inside of the tin. The strawberry halves should be sitting snugly beside each other, so it looks like a little crown inside the tin.
- Take the chilled crème pâtissière out of the fridge and spoon two thirds of the crème into a piping bag, fitted with a 1cm/½in nozzle.
- Pipe a swirl covering the exposed sponge completely in the bottom of the tin.
- Then pipe between each of the strawberries so the gaps are filled right to the top with the crème pâtissière.
- Set about 3-5 strawberries to one side for decoration, then hull and quarter the rest of them and place on top of the crème, so it raises the inside of the cake by about an inch.
- Pipe another swirl of crème pâtissière on top of the cut strawberries to cover the whole surface. Then smooth with a palette knife.
- Place the other disc of sponge on top of this, with the cut side uppermost, so it has a completely flat top. Brush with the remaining syrup.
- Gently press the top down quite firmly, so that the cake and filling push against the acetate to create the distinctive smooth and defined sides of the Fraisier cake.
- Lay the chilled marzipan circle on top of the cake and put the whole thing back in the fridge to set.
- Make some pretty decorations of your choice with melted dark chocolate.
- When ready to serve, remove the cake from fridge.
- Very carefully release the spring tin/loose bottom and remove the cake from the tin and from the acetate or cling film.
- Place onto a serving plate and decorate with reserved strawberries, chocolate decoration and a dusting of icing sugar. Serve chilled.